Thursday, January 1, 2009

The Sony CDP 302 CD Player

Not that one can tell from this blog, but I really do wield a soldering iron once in a while.

Lately I have had this hankering to revisit the quality CD players of yore. Back when the Ipod listeners among us were in diapers, CD players cost serious money and were actually made of metal and stuff. Inside of these vintage units were parts galore, not just air and a couple of chips. These were serious components built to last a lifetime, i.e. built to actually be repaired instead of chucked in the landfill. These were often very spartan players by modern standards because features (like a headphone jack!) cost you dearly. Over the last few months I have acquired several vintage players in working condition, something I absolutely guarantee will not be possible with the vast majority of current CD/DVD players, and I hope to restore and document a few of them.

The first up is the Sony CDP 302 which was manufactured in 1985 and listed for a non-trivial $550. It powered up and did its best to find the index, but the belts were crispy, of course, so it would not play. I begged belts from Mike, swabbed a few nasty bits, applied a few drops of oil and it worked. Interestingly, it easily played modern burned disks.

The CDP 302 has a nice bottom plate so access is easy. Therefore, I figured it was time to try a total re-cap to see how it would sound. I replaced a total of 44 caps with mostly Panasonic FCs, with a smattering of FMs. The final output coupling caps were replaced with Elna Silmic IIs. The 4 3.3k mfd power supply caps were boosted a smidgen to 4.7k at a slightly higher voltage.

Here is a topless shot:Build quality is very good. The transport is a hoot, stainless steel rails and all. Mike had never seen this mechanism before. The lubrication on the rails had turned to goo so the door barely opened at first. And it has a real transformer, not the chimpy sort of thing found in a modern player. The board at the left is lovely, with the very detailed legend actually printed on both sides. Eg. cap C 351 is identified on the trace side, a very nice touch. The output stage has a significant number of film caps, and there are a total of 6 of those cool clear copper foil caps between the DAC and the output. They obviously cared about the A in the D to A.

Here is the flip side:

The traces were fairly stout although I had several lift when doing hot pulls. Wicking was easier on the traces. Look at all the metal in that transport! Sony is currently a maddening manufacturer. They obviously have lots of very capable engineers, but many of their recent products have very serious QC issues. However, they obviously cared back in 1985 when they built this CD player.

I have been mulling over the CD source at the dawn of the medium, and why it took so long for CD sound to be competitive with that of vinyl. First, CD players were incredibly expensive, so the best of the players were very rare. The vast majority of us heard CD via down market, early generation players because that was all that was affordable. Second, the art of actually producing a CD was primitive, so much of what was available was crap compared to vinyl. Garbage in, garbage out as they say. On the other hand, designing a quality analog stage was easily attainable. Digital processing was a new art at the time, but the analog side of the equation was not. It has seemed to me that a spruced up, high quality vintage CD analog section could blow away your typical modern CD/DVD analog section. So, the sum of these theories has been that the top of the line vintage CD players are worth pursuing despite some digital conversion inadequacies, especially since they are so very cheap to acquire. With new belts and caps the game is afoot!

So, how does the re-capped and re-belted CDP 302 sound?

Very, very good it seems. In fact, it sounds so much better than my workshop Marantz CDR 630 (Professional!) that I am afraid I need to take a soldering iron to it. I hadn't realized how veiled the Marantz sounds. The first few minutes of the Sony were a bit inconclusive, but within 5 minutes the new caps settled in and the sound just opened up. This is a very smooth and detailed player. It gets a bit confused on complex passages, but it sounds great with female vocals. I need to let it burn in a bit more, but the reclamation project has already met my expectations.

UPDATE: it seems that Mike has a Sony CDP 520ES that at least superficially is a dead ringer for the CDP 302. Next week I will pop the top to see what's makes the 520ES worthy of the Esprit line.

Here is one last shot from the front, and I really need to take better photos:

Saturday, December 27, 2008

Pioneer SPEC 4 Amp Repair

I first saw and heard a SPEC system set up back in 1980 when I was stationed in Guam while in the Air Force. I never forgot it and 20 something years later, I finally got a chance to get my hands on a SPEC 1 pre-amp and a SPEC 4 power amp in very good condition. I had already had the other pieces of my system and was using a nice Pioneer SA-9500 II to power the restored Bose 901 Series IV's, which took me the better part of a month to bring them back from the dead. When I hooked up the SPEC 1 and 4, there was no comparsion. The depth and clarity of the music that the SPEC components produced went way beyond what the 9500 II could muster. I was in heaven...... for a while. About six months later, I got up one morning and went to turn on some tunes like I did every morning and flipped the power amp switch on and nothing. No lights, no nothing. I knew I was in trouble. I live in North Alabama and there was no repair shop anywhere around here that was capable of this kind of work, but I took a chance and carried it to a local electronic shop anyway, mostly out of desperation. Here, let me give a word of advice to anyone who needs a vintage stereo component repaired: if the place you take it to has alot of TV's sitting out, turn around and walk back out the door you came in. That guy kept it a month and was no closer to repairing it than the day I brought it in. Finally, I'd had enough and starting looking around on the net for a real repair shop to ship it to. I looked a several ads and read their sales pitch and then I saw and read the reviews for Austin Stereo Repair in Austin, Texas and knew this was the place I wanted to work on my SPEC 4. Mike, the guy who runs the shop, was very nice and kept me informed of everything and every step of the repair process that he was making. The turn around time was a bit longer but that was entirely my fault. He told me exactly how to pack the amp to ship to him and like a idiot, I didn't listen to him and tried to save a few bucks by not wrapping it in bubble wrap. The amp arrived with a busted bumper on the back. It could have been alot worse and I learned my lesson. If you ship to him and he tells you how to pack it, take my advice; do it! Finally, I got it back and let me tell you, I cannot write a good enough review for the work Mike performed. It sounds better than it did before it died! Also, this guy must be a clean freak because you can eat off the inside of this amp! Austin Stereo has my business from now on. Thanks Mike!

Monday, December 22, 2008

Encore from Gothenburg

Johan Persson has kindly provided several more photos of his collection.

First up are a pair of snapshots of the diminutive component that I commented on in the earlier post. It is another marque that I have never encountered (or even heard of!): Skantic. I love the simple elegance of these northern European designs. I must say I am still a bit perplexed as to whether this is actually an integrated amp or a preamp. The bird logo is very reminiscent of Fisher. The legend above the knobs and switches just cracks me up. I would guess volume, balance, bass, treble, phono, tape, radio (duh), and power...

The single external transistor really has me puzzled. It says stereo on the front??!! I really need to know my Din connectors better to sort all this out. It also seems to have 3 fuses, generous for such a tiny package. Update: it was actually easier to see via the blog. Interesting. The speaker connectors are far right and left, above the fuses. And Mike says the single external transistor is part of the regulator...

And last, but not least, is an absolutely gorgeous Ravensbourne tuner/integrated pairing from Rogers, down Angleterre way. From the photo Johan has the original literature as well. I am incredibly jealous.


The large screen on top of the tuner case would suggest this is a tube tuner?? It would seem to have a tuning eye to the right of the scale. These are just lovely. My semi-useless Orion Blue Book lists the amp as being produced from '73 to '77. I have my doubts, these would seem to be earlier items. I recall this is Orion's default time frame for those moments when they are clueless. Time to email Johan for some more information...

Wednesday, December 17, 2008

The Goteborg Chapter

It seems The Stereo Club has a previously unknown chapter in Goteborg, Sweden.

Goteborg, city of the Goths, and otherwise known as Gothenburg to those of us in the states, is a nicely sized city of half a million on the southwest coast of Sweden. It is home to the largest university in Scandinavia, as well as the bands Ace of Base and The Soundtrack of Our Lives. (Hmm, not so different from Austin, Texas.) I confess the former band is a guilty pleasure and the latter is a not so guilty pleasure.

I have recently had the pleasure of exchanging emails with Johan Persson, an avid collector of '70s stereo components from Gothenburg. Johan has a very substantial collection of Pioneer, Marantz, and Tandberg equipment, as you can see from the following. First up, Pioneer::


Here is a stack of Marantz gear:


And a very tasty selection of Tandberg equipment:


I really need to find out what the little amp on top is. I am a sucker for smallish Euro amps.

Johan says this is a stack of a Swedish DIY kit amps sold in the '70s under the names Sentec and Semicon:


I have never seen these before.

And some Akai gear:


All the above are normal obsessions, although in total perhaps a bit extreme. My wife sends her condolences to Johan's wife. However, the following obsession with headphones is new to me. I have the normal 7 or 8 headphones. This is truly impressive:


Johan: thanks for the photos! And welcome to The Stereo Club!

Tuesday, December 2, 2008

Apex Jr.: Your Source for Affordable Electronics

About a year ago I was poking along down the Information Highway, doing a bit of research on the Realistic Minimus 7 loudspeaker. I stumbled into a thread on AudioKarma that suggested an interesting tweeter replacement could be found at a site called Apex Jr. ApexJr.?? Whatever is an Apex Jr.? I followed the link and answered that question.

It turns out that Apex Jr. is the nom de web of Steve Slater. Steve is pretty much a lifelong veteran of the electronic surplus business and "Apex Jr." was originally how he answered the phone as a kid at his father's surplus business, Apex Electronics. About 16 years ago Steve started his own business and those of us with gear to fix (or build) are the beneficiaries.

Apex Jr. is an online electronic surplus store that specializes in audio components. Steve has a healthy selection of subwoofer amplifiers (see this earlier post), including both the Miller and Kreisel 150 watt and 250 watt units. For the speaker builders and restorers among you he has a host of speaker parts including drivers, binding posts, capacitors, resistors, and wire. Like all good surplus stores he has his share of those uncategorizable items that make for a fun browse. Here is a sampling of some of my recent purchases from Apex Jr.:


Starting from 12 o'clock: a BMI 33mfd/450v axial capacitor; a Nichicon 12000mfd/50v capacitor; a truly huge rubber foot; rca connectors with strain relief; a pair of heavy duty speaker binding posts; a Nippon Chemi-Con 15000mfd/63v capacitor. In the center is the Sonance tweeter that can be used with the Realistic Minimus 7.

Steve's prices are extremely reasonable and the quality of the merchandise is first rate. The 15000mfd caps above are a huge bargain at $2.99. They are a no-brainer power supply upgrade for a significant number of '70s receivers. The binding posts are very heavy duty, and are much better than replacement quality.

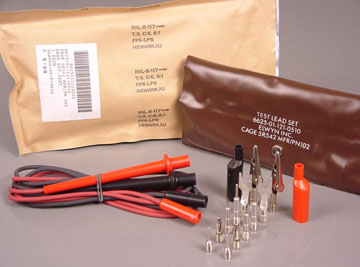
I highly recommend the 16 piece test lead set for $9.99 pictured here. Mike's comment on seeing mine: 'That's old school.'

I have placed 3 orders with Steve and each has arrived within 2-3 business days, nicely packed. Steve takes credit cards, but has to charge a 3% upcharge to keep his overhead low.

Give Steve a call at 866-4-ApexJr. For those of us more numerically oriented that is (866) 427-3957. Oddly enough, he does not list his business hours. I know he has customers as far away as New Zealand, so I bet he gets phone calls at some very odd hours.

Steve is based in La Crescenta, California. His main warehouse (of 3) is located by the 2 and 210 freeways and vistors are welcome, although by appointment. It should be noted that Steve has many more items than those displayed on his web site. Here is just a portion of one warehouse:

Sunday, November 30, 2008

Call Me Lightning: the Pioneer SA-606 Integrated Amplifier

Dum Dum Dum Do Day
Dum Dum Dum Do Day

See that girl who's smiling so brightly,
Dum Dum Dum Do Day

Well I reckon she's cool and I reckon rightly,
Dum Dum Dum Do Day

She's good looking and I ain't frightened,
Dum Dum Dum Do Day

I'm gonna show you why they call me lightning.
Dum Dum Dum Do Day


This particular Pioneer integrated amp is called Lightning because that’s what blew it up.

This SA-606 was born somewhere around 1973 (Orion is clueless) and died violently in what Mike delicately terms ‘an event’. That event took out half the power supply diodes and every single transistor short of the outputs, tone control circuit included. This amp probably should not have been restored based purely on cost benefit. It ran away on the Sencore, so we pulled the nicely mounted heatsink, and tested the outputs. They were intact so we figured re-cap it and figure it out from there. After my re-cap and Mike walking through transistor carnage we found ourselves committed to a very significant cost in time and parts.

Yes, even the little 3-legged beasties in the tone cardlet at the front left were torched. All caps were replaced except for the relatively modest main filters. This was a relatively easy amp to work on, but Pioneer made the bottom cover too small and several caps were very difficult to reach.

The interesting thing about the effort is the end product was essentially an electronic clean slate up to the outputs, lots of new parts in an old box. So, how does it sound?

Very, very good it turns out. This amp is not a power house, but it is a very lively performer and well suited to a bit of Cobwebs and Strange. Now where is that Who CD? Entwhistle’s bass leads on ‘Happy Jack’ or ‘Call Me Lightning’ are running through my head now hours after crappy YouTube renditions. Ahh, the sacrifices my art demands.

Anyway, this SA-606 is a bit rough around the edges cosmetically, but it sounds great.

Tuesday, November 25, 2008

The JVC JR-S200 Receiver

Ah, here we have yet another under appreciated Japanese receiver manufacturer. JVC's styling is, er, distinctive, and I confess not to my taste until recently. But I have a new found appreciation of this line after working on this unit and also getting a gander of the very impressive JR-S600. The S200 is 2nd in the line that extends from the S100 through the S600, and is listed at 35 watts per side. Orion says it was sold from '76 to '80 and retailed for $300.


While a bit glitzy and slider-dominated it is a handsome unit to my newly acclimated eye. The thumb wheel tuner is a bit angled and much smaller than that of the Marantz tuners and receivers of the era. The end caps are interesting, sort of plasticky, faux heat sinkish. Definitely, the JVC designers were not running with the Pioneer/Marantz/Yamaha crowd with wood cases.

Wow, my photo skilz were not exactly shining the day I took these snapshots. The chassis was not too bad to work on although there were a few difficult to change caps on the amp board at the right. The tuners are in the center; the phono section in the center, back right, just to the left of the heat sink. I replaced 57 caps with Panasonic FCs. Then Mike pointed out that there were 4 more buried in the tone control board mounted vertically in the front, behind the sliders. That board was a bit of a challenge.

The JVC is a perky sounding little receiver. It is not exactly a powerhouse, but has enough slam to sound better than 30 watts should. Pick one of these up if you find one. If you ever stumble across the big brother S600, buy it in a heartbeat. It is one seriously flashy, large receiver and at 120 watts per channel can run with any of the big dogs.

Friday, November 21, 2008

The Nikko NR 815 Receiver

Nikko is one of the underrated receiver manufacturers of the vintage era. Their build quality is very good, their styling has held up well, and they are very easy on the ears. They tend to be undervalued on ebay, a shame. The Alpha/Beta/Gamma series of separates from Nikko does garner a reasonable amount of respect, however.

This NR 815 was an ebay purchase and it worked well out of the box (always a worry.) The trusty Orion Blue Book says it was manufactured between '77 and '82. I suspect that range is a bit wide, but close enough. The 815 seems to have been the middle of a very broad offering with the 315 being the entry level and the 1415 being the top of the line. When I grow up I want an NR 1415 with 175 watts per channel! The NR 815 has 55 watts and retailed at a hefty $470. This is a largish receiver:

Large usually makes it easy to work on:

The 815 is fairly well laid out with one major exception. The phono section, situated, as usual, in the back right of the chassis, sits underneath the tuning capacitor. Whatever was Nikko thinking? One of the first rules of receiver restoration is never mess with the tuning string, so the capacitor had to stay in place. I had to fish out and replace caps from underneath via what little dexterity have remaining in my left hand. I love vintage, but vintage digits really suck at that dexterity thing.

The drive card is mounted vertically in front of the heat sinks. I was able to re-cap that without removing. The relay ciruitry is just in from of the drive card and the regulator circuitry in front of that. The tuners are to the right.

I am usually obsessive about the cap replacement count, it's sort of a solder monkey's counting coup. However, I managed to misplace my coup stick, er, slip of paper with the exact total. It was something over 70, I swear.

Re-capped with the controls spritzed this a nice sounding unit. The overall presentation is a bit mellow and would fit very nicely with a digital source. At 55 watts a side a bit of care needs to be taken with speakers if you are wanting to fill a largish room with Led Zeppelin. But, all in all, the NR 815 will eat your Fry's HT black box for breakfast and lunch, and look good doing it.

Sunday, November 16, 2008

Subwoofer Pas de Deux

A while back Parts Express offered a deal that seemed too good to pass up: the Spherex XBox system with 5 satellites and a subwoofer carcass, minus the amp and remote for $99.00. Plus free shipping! (I see now that the price is $75, a deal!) The Spherex system was well reviewed and the satellites use technology from Mirage. The sub contained a 6 channel amp that apparently was failure prone, so the systems have been a PE close out for a while, sans amp of course.

I sprung for 2 and scattered the satellites among work room, kid's room and friends. But what to do with the subwoofer carcasses with a hole in back?

Apex Jr. came to the rescue.

I purchased the M&K 150 and the Audiofile VRS 1205 amps since they seemed to have nearly the correct dimensions for the cut out. Each is a bargain at $99.95 and nominally rated at 150 watts. These are real amps with real transformers, not digital amps. Here are the finished products:


The Spherex boxes have a downward firing 8" driver with a port. Fit and finish is good and I love the handle on top. The driver is a respectable performer, but the amps probably deserve a bit more than the Spherex carcass can provide. I shouldn't complain since I spent just a bit more than 2 hours assembling the pair. Both amps required a bit more than an inch off the width and just slight shaving off the height of the opening for installation.

Both amps are well made with the M&K having the edge in performance, but the Audiofile having the edge in gadget factor. The first photo above shows the remote sensor installed on the front of the Audiofile. Oh yeah, that is a new hole you will have to cut on the front. The remote works well and allows you to crank the volume for the good parts of Con Air and drop it back to realistic levels for music.

If you already have a home theater receiver you can have a very respectable 5.1 system for under $200, definitely a deal. This is a killer system for the kids' game room or a budget theater system. Break out the jig saw and get some sweat equity in a subwoofer!

Monday, November 10, 2008

The Signal Sucks: FM Side Band Hiss

Does your FM station sound like crap these days?

Is the sonic gravel getting you down?

If so, I bet you are listening to the modern sound of side band garbage through a vintage FM tuner.

The FM frequency spectrum is increasingly being crammed with signals that were never envisioned by the designers of medium decades ago. Here in Austin, the classical FM station KMFA has broadcast a benchmark quality signal since its inception, but these days you are wasting our ears trying to listen to it with a vintage tuner. Recently KMFA sold off the edges of its frequency range to another signal, and you can hear it as hiss behind the music.

The FM signal broadcast is not just a single licensed frequency but includes 130 kilohertz of bandwidth above and below the designated frequency. According to KMFA's consultant engineer the FM broadcast system originally used the entire licensed spectrum to minimize distortion, and our vintage tuners reflect that philosophy. They tend to grab the full width available with broad filters. However, the modern broadcast signal now lives in a much narrower portion of the licensed band (15 khz) , and the edges of that band are a business opportunity.

What is that business opportunity? There are a number of possibilities, but in all likelihood the offender is HD radio. I highly recommend this Wikipedia article. Note the FM spectrum images down the page on the right. The second image is of the signal that gives your vintage tuner a hard time. According to the article only 1% of the station's power is devoted to the HD signal. A move is afoot to increase this to 10% in order to improve the quality of the HD signal at the expense of the analog signal. (Shudder.)

So what prompted this little rant? I hadn't listened to the wonderful KGSR in a week or two on my Advent 300 receiver, but tonight the hiss was just depressing. I recently restored this little Henry Kloss/Tom Holman gem using Elna Silmic II caps with a few 1 mfd films and the tuner is sounding great. I guess I need to learn something about FM filters...